PBR
PBR Materials
Introduction
After following the standard material tutorial and also excelling in unleashing its power, it is a good time to go further and look at another emerging kind of materials called PBR Materials standing for Physically Based Rendering Materials.
PBR rendering techniques aim to simulate real life lighting.
PBR is a grouping of techniques; it does not force you to choose one in particular. Among others, we can cite some like:
In Babylon.js, PBR is done thanks to PBRMaterial. This material contains all features required by modern physically based rendering. For beginners we also created two additional materials to simplify your first contact with PBR. If you want to directly dig into the richer version, please have a read at Master the PBR for more information on how to use the main material.
You can find a complete demo of the PBRMaterial here
The two additional materials are PBRMetallicRoughnessMaterial and PBRSpecularGlossinessMaterial. They both implement a specific convention based on GLTF specifications:
- Metallic roughness convention: https://github.com/KhronosGroup/glTF/blob/master/specification/2.0/README.md#metallic-roughness-material (This is the recommended convention)
- Specular glossiness convention: https://github.com/KhronosGroup/glTF/blob/master/extensions/Khronos/KHR_materials_pbrSpecularGlossiness/README.md
PBRMetallicRoughnessMaterial
This material is based on five main values:
- baseColor / baseTexture: The base color has two different interpretations depending on the value of metalness. When the material is a metal, the base color is the specific measured reflectance value at normal incidence (F0). For a non-metal the base color represents the reflected diffuse color of the material.
- metallic: Specifies the metallic scalar value of the material. Can also be used to scale the metalness values of the metallic texture.
- roughness: Specifies the roughness scalar value of the material. Can also be used to scale the roughness values of the metallic texture.
- metallicRoughnessTexture: Texture containing both the metallic value in the B channel and the roughness value in the G channel to keep better precision. Ambient occlusion can also be saved in R channel.
- environmentTexture: texture
As you are already really familiar with the Babylon Standard Material now we'll only try to address here the main differences and as the simplest setup; your only changes will be to instantiate a PBRMetallicRoughnessMaterial instead of a StandardMaterial.
var pbr = new BABYLON.PBRMetallicRoughnessMaterial("pbr", scene);
Apply this material to the object of your choice, e.g.:
sphere.material = pbr;
Now you can define the physical based values of your material to get a great look and feel:
pbr.baseColor = new BABYLON.Color3(1.000, 0.766, 0.336);
pbr.metallic = 0;
pbr.roughness = 1.0;
You can see a live version here -
With this specific configuration, you can see that there is no reflection at all (metallic set to 0) and no specular (roughness set to 1).
If we want to introduce more reflection we can just do the opposite:
pbr.baseColor = new BABYLON.Color3(1.000, 0.766, 0.336);
pbr.metallic = 1.0;
pbr.roughness = 0;
But in this case we need something to reflect. To define this environment, just add this line:
pbr.environmentTexture = BABYLON.CubeTexture.CreateFromPrefilteredData("/textures/environment.dds", scene);
This call will create all required data used by the materials to produce final output.
You can see a live version here -
Perhaps a bit too reflective now, so let's add more roughness to give it a more golden look:
pbr.baseColor = new BABYLON.Color3(1.0, 0.766, 0.336);
pbr.metallic = 1.0;
pbr.roughness = 0.4;
pbr.environmentTexture = BABYLON.CubeTexture.CreateFromPrefilteredData("/textures/environment.dds", scene);
You can see a live version here -
To get more precise over how metallic and roughness on your object, you can also specify the metallicRoughnessTexture:
pbr.baseColor = new BABYLON.Color3(1.0, 0.766, 0.336);
pbr.metallic = 1.0; // set to 1 to only use it from the metallicRoughnessTexture
pbr.roughness = 1.0; // set to 1 to only use it from the metallicRoughnessTexture
pbr.environmentTexture = BABYLON.CubeTexture.CreateFromPrefilteredData("/textures/environment.dds", scene);
pbr.metallicRoughnessTexture = new BABYLON.Texture("/textures/mr.jpg", scene);
You can see a live version here -
PBRSpecularGlossinessMaterial
This material is based on five main values:
- diffuseColor / diffuseTexture: Specifies the diffuse color of the material.
- specularColor: Specifies the specular color of the material. This indicates how reflective is the material (none to mirror).
- glossiness: Specifies the glossiness of the material. This indicates "how sharp is the reflection".
- specularGlossinessTexture: Specifies both the specular color RGB and the glossiness A of the material per pixels.
- environmentTexture: texture
The setup of this material is comparable to the one used for PBRMetallicRoughnessMaterial:
var pbr = new BABYLON.PBRSpecularGlossinessMaterial("pbr", scene);
pbr.diffuseColor = new BABYLON.Color3(1.0, 0.766, 0.336);
pbr.specularColor = new BABYLON.Color3(1.0, 0.766, 0.336);
pbr.glossiness = 0.4;
pbr.environmentTexture = BABYLON.CubeTexture.CreateFromPrefilteredData("/textures/environment.dds", scene);
You can see a live version here -
.
The specularGlossinessTexture can then (like the metallicRoughnessTexture texture) be used to provide more control over specular and glossiness:
pbr.diffuseColor = new BABYLON.Color3(1.0, 0.766, 0.336);
pbr.specularColor = new BABYLON.Color3(1.0, 1.0, 1.0);
pbr.glossiness = 1.0;
pbr.environmentTexture = BABYLON.CubeTexture.CreateFromPrefilteredData("/textures/environment.dds", scene);
pbr.specularGlossinessTexture = new BABYLON.Texture("/textures/sg.png", scene);
You can see a live version here -
.
Light setup
Dynamic lights are an important part of your PBR setup. You can decide to have no light and only use the environment texture to light your scene or you can decide to add additional light sources to enhance your rendering.
By default light intensities are computed using the inverse squared distance from the source. This is a type of falloff that is pretty close from what light does in real life. So the further you are, the bigger your intensity will need to be to reach a surface.
To even go further, the intensity you define on the lights follows physics notions:
- Point and Spot lights are defined in luminous intensity (candela, m/sr)
- Directionnal and Hemispheric lights in illuminance (nit, cd/m2)
You'll find more info about how dynamic lighting works in the Master the PBR
Env map
As you have seen before, you must provide a DDS file (containing a cube texture) to define a compatible environment. This is the highly recommended way to setup the environment texture.
Creating a dds environment file from an HDR image
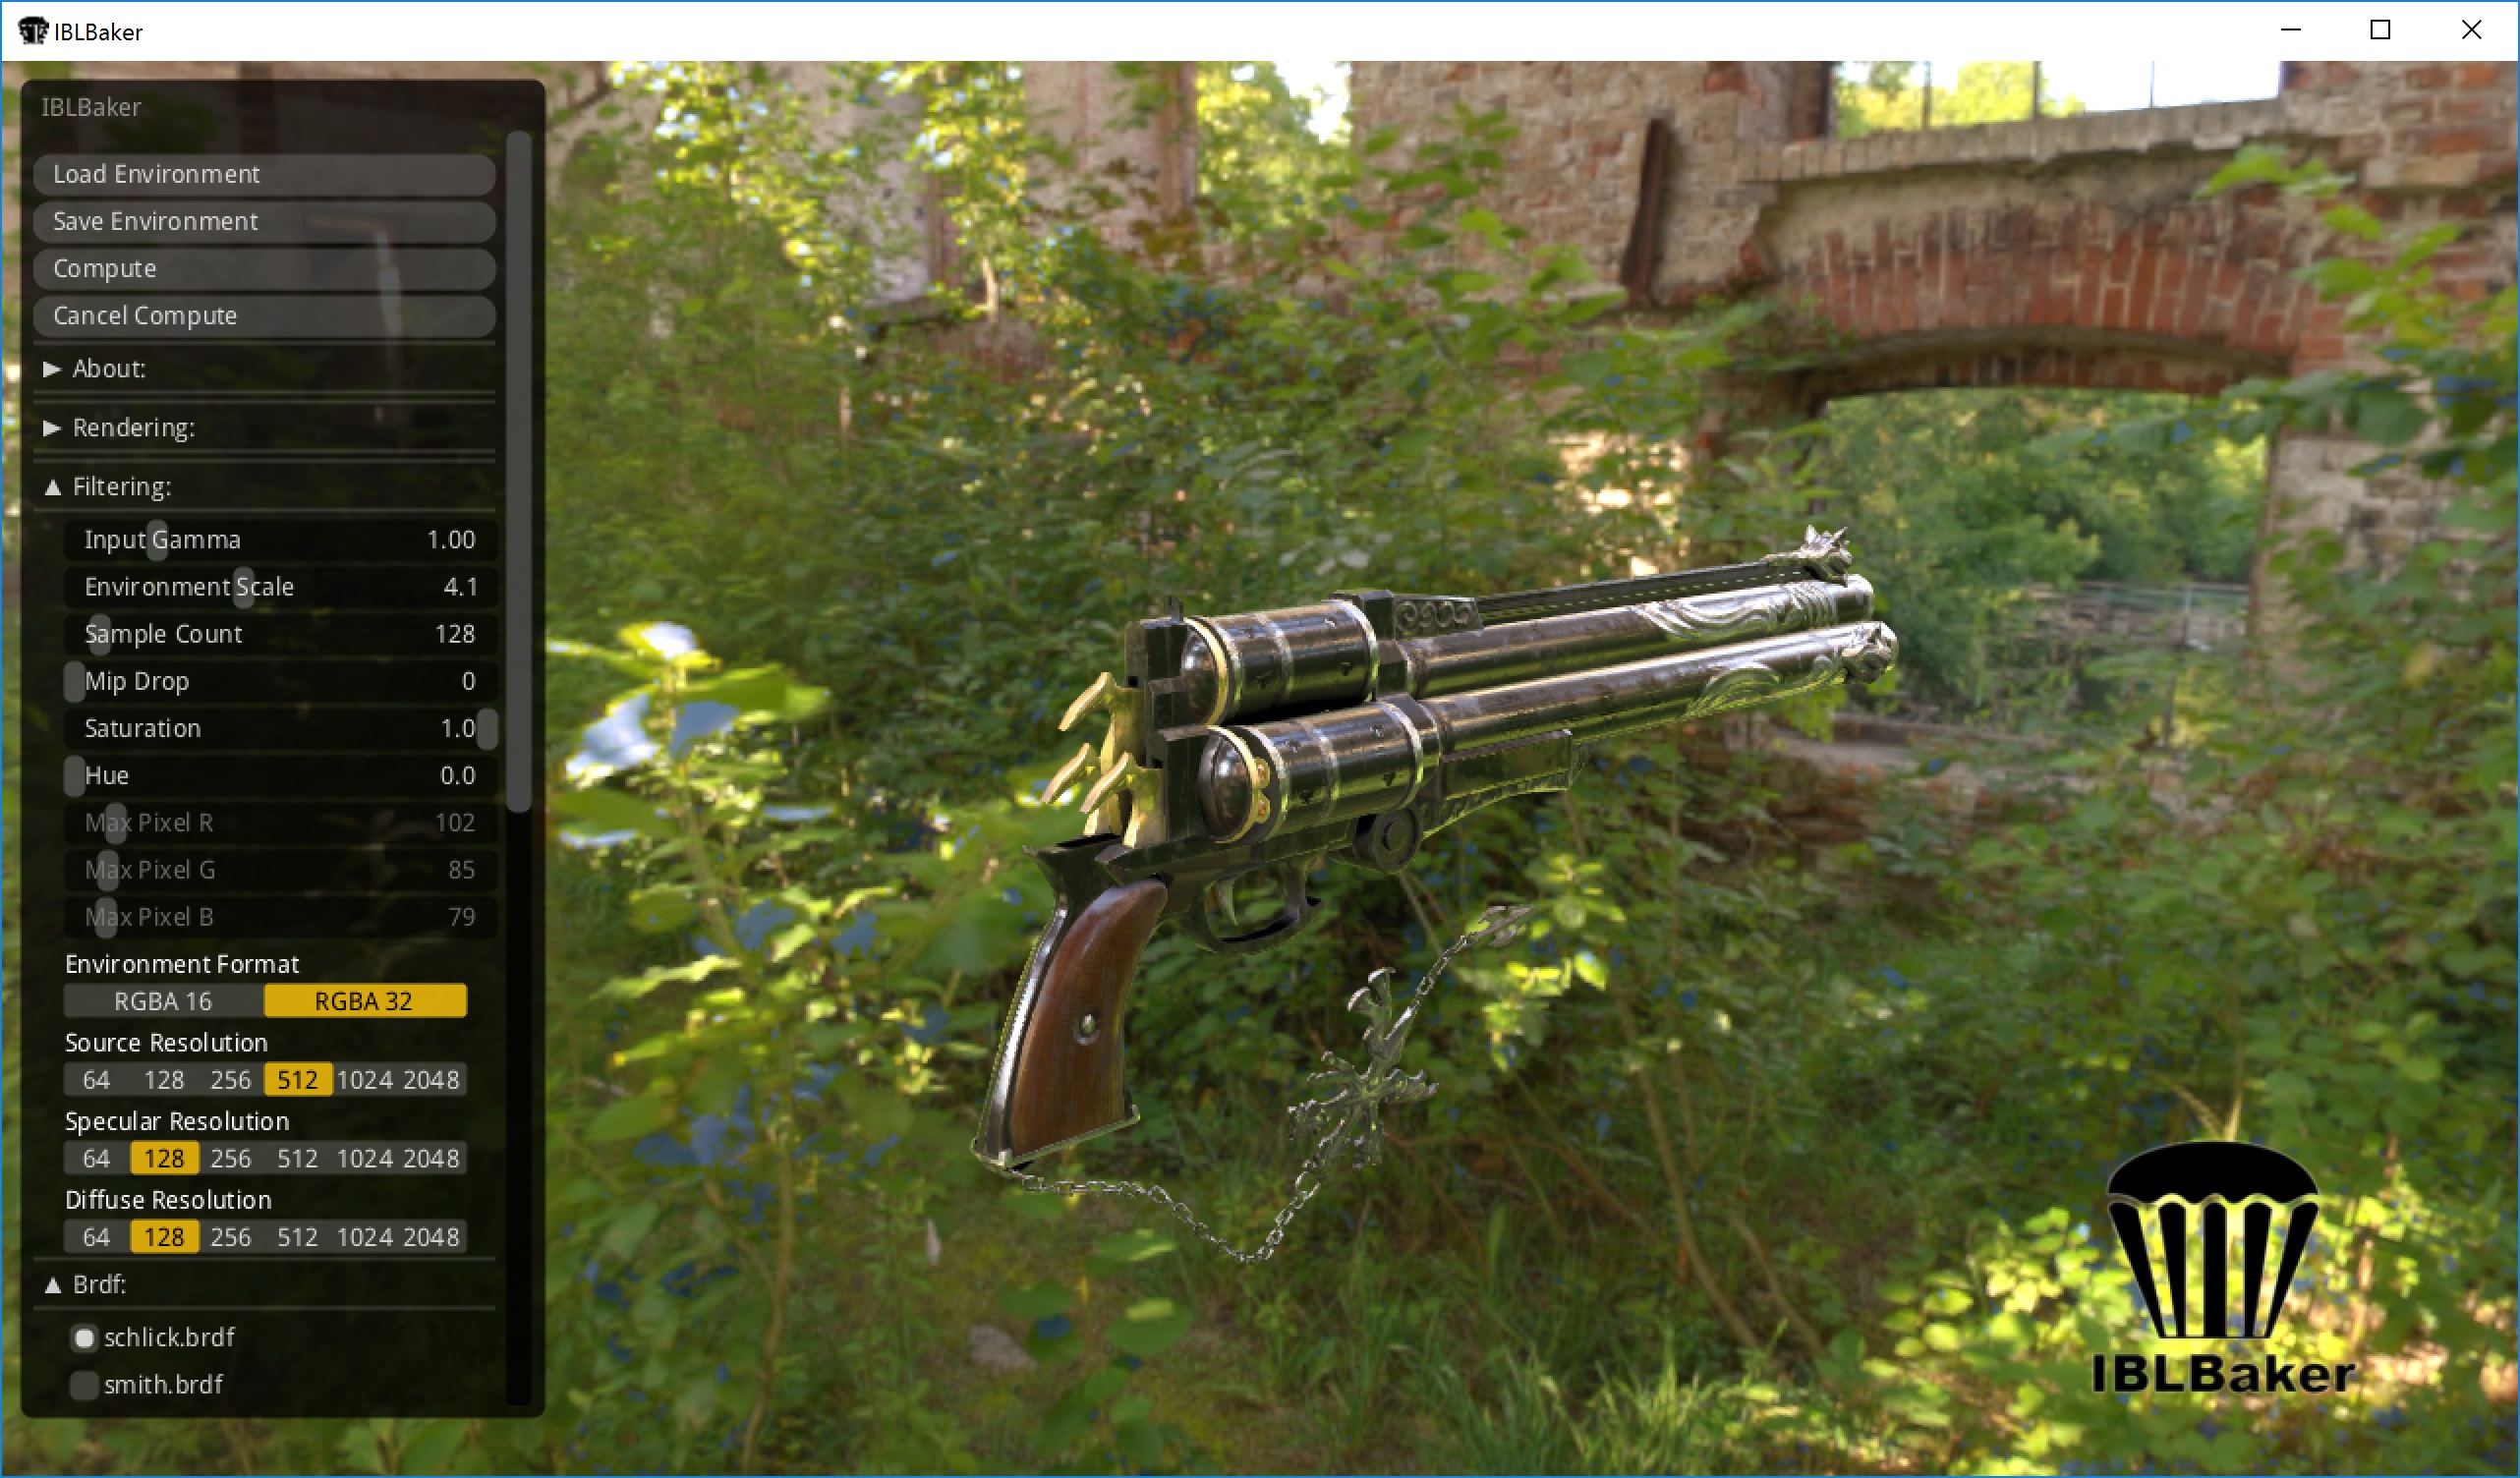
We recommend using IBLBaker: https://github.com/derkreature/IBLBaker After cloning the repo, you will be able to go to /bin64 folder and launch IBLBaker.exe.
Now use the "Load environment" button to load a HDR image (Try one from HDRLib or there as well)
We recommend to play with the environment scale to define the correct brightness you want. You may also want to reduce the output size by setting the specular resolution to 128 or 256:
Once you are satisfied with the overall result, just click on "save environment" button and you are good to go!
Please do not forget to write full name with extension in order to make the save works correctly
Using a pure cube texture
While using a dds cube texture is the best option, you may want to still rely on classic cube texture (mostly for size reason). So you can still do this as well:
pbr.environmentTexture = new BABYLON.CubeTexture("textures/TropicalSunnyDay", scene);
In this case you won't be able to get HDR rendering and some visual artifacts may appear (mostly when using glossiness or roughness).