Making a Simple Driven Car
Making a Simple Driven Car
This is to show a practical use of translate, rotate and using a parent.
The Design
The car will be designed in the same way as for the Simple Car. In this case the car will be flatter and the view will be from behind the car and this will be fixed as the camera will not be attached to the canvas. The front wheels will be further away from the side of the body to allow them to turn, each will have its own pivot. The car will be driven forward using the space bar as an accelerator up to a maximum speed. The front wheels will be steered with A and D. The rotation of the wheels will be matched with the speed of the car.
The car will be created with the origin in the middle of the centres of the two rear wheels.
The ground will be covered in random boxes to give the illusion of movement. For simplicty it will be possible to drive off the ground with no consequences other than perhaps the loss of the sense of motion.
Steering
The steering will be based on a simplified Ackerman steering system. In the true Ackerman system when turning the rotation of the left and right front wheels will be different. For the purposes of this simulation they will be taken to be the same.

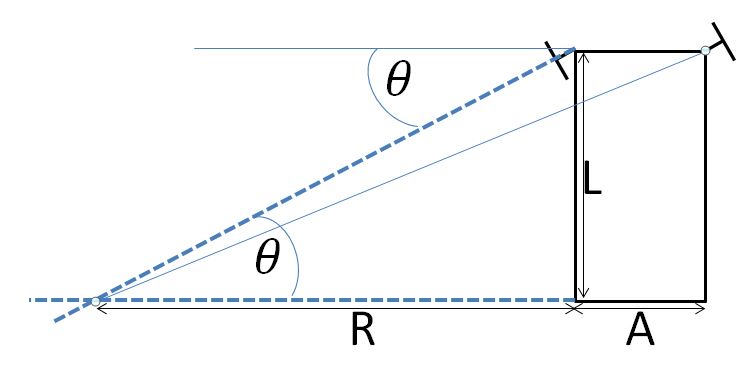
The front wheel pivots and the rear wheel supports form a rectangle with a distance L between thefront and rear and a distance A betwen the two front wheels. When the front inside wheel is turned through an angle of theta the centre of rotation is where the line through the pivot point normal to the wheel meets the line through the two real wheel supports. The distance R of the centre of rotation from the inside rear wheel support can be found using R = L/tan(theta) and from the middle of the to rear wheels it is A/2 + L/tan(theta).
Mathematics of Rotation for Car
When the BabylonJS engine is running at F frames per second the time for one frame is 1/F seconds.
When the speed of the car is D units per second the distance travelled by the car is D/F units.
When the car is driven forward (ie theta =0) at a speed of D units per second the distance travelled by the car in one frame is D/F units.
Let the radius of each wheel be r units. In one frame a wheel travels a distance of D/F units and turns through an angle of psi radians where r * psi = D/F and so psi = D/Fr.
When the car is turning each wheel will rotate at different rates as they travel different distances in the same time. For simplicty the following conditions are imposed for the mathematical calculations:
- The wheel pivots and supports will be taken as the centre of the wheels.
- The rear inside wheel travels a distance D.
- The angle of rotation turned by the car for one frame is phi radians.
The rear inside wheel travels a distance R phi = D/F ands so phi = D/RF.
For one frame let this wheel rotate through an angle of psi0 then
r psiRI = D/F and so psiRI = D/rF
The rear outside wheel travels a distance (R + A) phi .
For one frame let this wheel rotate through an angle of psi1 then
r psiRO = D*(R + A)/F and so psiRO = D*(R + A)/Fr
The front inside wheel travels a distance sqrt(R*R + L*L) phi .
For one frame let this wheel rotate through an angle of psi2 then
r psiFI = D*sqrt(R*R + L*L)/F and so psiFI = Dsqrt(R\R + L*L)/rF
The front outside wheel travels a distance sqrt((R + A)*(R + A) + L*L) phi .
For one frame let this wheel rotate through an angle of psi3 then
r psiFO = D*sqrt((R + A)*(R + A) + L*L) and so psiFO = D*sqrt((R + A)*(R + A) + L*L)/rF
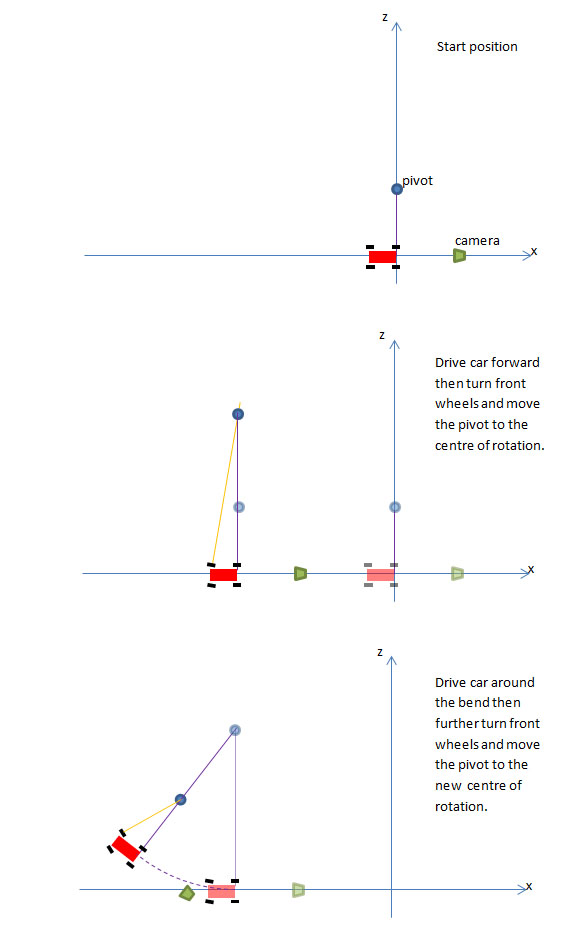
At any point when the front wheels are turned the centre of rotation and the turning radius R need to be recalculated. The following diagram indicates the procedure.

Applying the Calculations
The centre of rotation will be an empty mesh, the pivot, which will be the parent of the car. The pivot's position will depend on the angle theta of the front wheels. The car has been created with its front pointing towards the negative x axis. When the pivot rotates to turn the car its local negative x axis will always be the direction of travel and the centre of rotation will always be along its local positive z axis. R will be given an initial value and the pivot set at R along the local positive z axis. When theta = 0 any movement will be linear and the pivot will be translated a distance of D/F along the local negative x axis per frame.
When theta changes a new value NR for the radius of the circle of rotation will be calculated and the centre of rotation translated a distance R - NR along the local positive z axis and the car translated NR - R along the local positive z axis. This results in the car not changing position and the centre of rotation being a distance NR froom the car. R is then set to NR.
Turning the Front wheels
An action manager is used to register a key up and a key down event. There are three keys used A, D and Space (with or without caps lock). As acceleration and turning can take place at the same time multiple key presses are required. Whenever a key down event occurs the key is added to an associative array formed from a map object and the array value is set to true. It is reset to false on key up.
  var map ={}; //object for multiple key presses
  scene.actionManager = new BABYLON.ActionManager(scene);

  scene.actionManager.registerAction(new BABYLON.ExecuteCodeAction(BABYLON.ActionManager.OnKeyDownTrigger, function (evt) {
        map[evt.sourceEvent.key] = evt.sourceEvent.type == "keydown";

    }));

  scene.actionManager.registerAction(new BABYLON.ExecuteCodeAction(BABYLON.ActionManager.OnKeyUpTrigger, function (evt) {
        map[evt.sourceEvent.key] = evt.sourceEvent.type == "keydown";
    }));
In the animation loop whenever A or D is pressed the front wheels are turned by a small amount. Since theta the angle made by the fron wheels is changed the centre of rotation is repositioned. The example below is for turning left.
if((map["a"] || map["A"]) && -Math.PI/6 < theta) {
    deltaTheta = -Math.PI/252;
    theta += deltaTheta;
    pivotFI.rotate(BABYLON.Axis.Y, deltaTheta, BABYLON.Space.LOCAL);  //turn front wheels
    pivotFO.rotate(BABYLON.Axis.Y, deltaTheta, BABYLON.Space.LOCAL);
    if(Math.abs(theta) > 0.00000001) { //when not near to 0 calculate new radius of rotation
        NR = A/2 +L/Math.tan(theta);
    }
    else { //when theta near 0 make it 0 and give NR some value
        theta = 0;
        NR = 0;
    }
    pivot.translate(BABYLON.Axis.Z, NR - R, BABYLON.Space.LOCAL); // translate pivot to centre of rotation from current position
    carBody.translate(BABYLON.Axis.Z, R - NR, BABYLON.Space.LOCAL); //as this translation will move the car translate it back to where it was
    R = NR;
};
Moving the Car
When speed greater than zero and When theta is not zero rotate the pivot and rotate each wheel depending on its position. Otherwise translate the pivot in the local negative x direction and rotate wheels by same amount.
if(D > 0) {
    phi = D/(R * F);
    if(Math.abs(theta)>0) {
         pivot.rotate(BABYLON.Axis.Y, phi, BABYLON.Space.WORLD);
        psiRI = D/(r * F);
        psiRO = D * (R + A)/(r * F);
        psiFI = D * Math.sqrt(R* R + L * L)/(r * F);
        psiFO = D * Math.sqrt((R + A) * (R + A) + L * L)/(r * F);

        wheelFI.rotate(BABYLON.Axis.Y, psiFI, BABYLON.Space.LOCAL);
        wheelFO.rotate(BABYLON.Axis.Y, psiFO, BABYLON.Space.LOCAL);
        wheelRI.rotate(BABYLON.Axis.Y, psiRI, BABYLON.Space.LOCAL);
        wheelRO.rotate(BABYLON.Axis.Y, psiRO, BABYLON.Space.LOCAL);
     }
     else {
         pivot.translate(BABYLON.Axis.X, -distance, BABYLON.Space.LOCAL);
        wheelFI.rotate(BABYLON.Axis.Y, psi, BABYLON.Space.LOCAL);
        wheelFO.rotate(BABYLON.Axis.Y, psi, BABYLON.Space.LOCAL);
        wheelRI.rotate(BABYLON.Axis.Y, psi, BABYLON.Space.LOCAL);
        wheelRO.rotate(BABYLON.Axis.Y, psi, BABYLON.Space.LOCAL);
     }
}
Playground Examples
The first playground is the gamelet as described above.
NOTE to use the keys with the playground you MUST click on the car after it loads or you use RUN.
Playground - The Car Gamelet -
The second playground is similar. The pivot has been made into a sphere so you can see it and the camera position changed to give an overview. The camera is now attached to the canvas so you can change viewing angles. This may help give more insight into the workings of the code.
Playground - The Car Overview -